How to deploy a Scala app to Amazon EKS
In this tutorial I’ll try to enlist a series of steps that have to be taken in order to deploy a new app onto Amazon Kubernetes Service, which requires more effort than one could think of at first glance. I spent a lot of time to move an app from Google Kubernetes Engine (GKE) to AWS EKS and it’s quite clear to me that this is not as simple as it should be.
First of all let me explain why I had to do something like that, and believe me, after a lot of struggling I can say out loud that if you have the chance to choose, well GKE is the only logical outcome when it comes to Kubernetes (K8s) services. That’s because Google invented this technlogy and also because the UX that GCP gives you “for free” is a thousand times better. Administrating a K8s cluster on EKS is like going back in time. Just to be clear, it works down the line, but still it feels like wasting your time if compared to the main alternative. Said that, let’s begin our journey to Kubernetes in the manner of Amazon.
Using a tool like K8s we want to be able to achieve a clear set of key factors:
- to deploy quickly and predictably;
- to scale our deployments horizontally;
- to gain the ability of performing Continuous Deployments (CD);
- to optimize costs;
- to be able to deploy on multiple providers using the same technology/approach.
In this tutorial our attention will be focused on EKS, but we can re-use the same approach to every cloud service that provides a K8s service (e.g. GKE or Microsoft Azure Kubernetes Service). As long as the orchestrator is Kubernetes we will be able to execute almost all the commands that we’re about to introduce in this article.
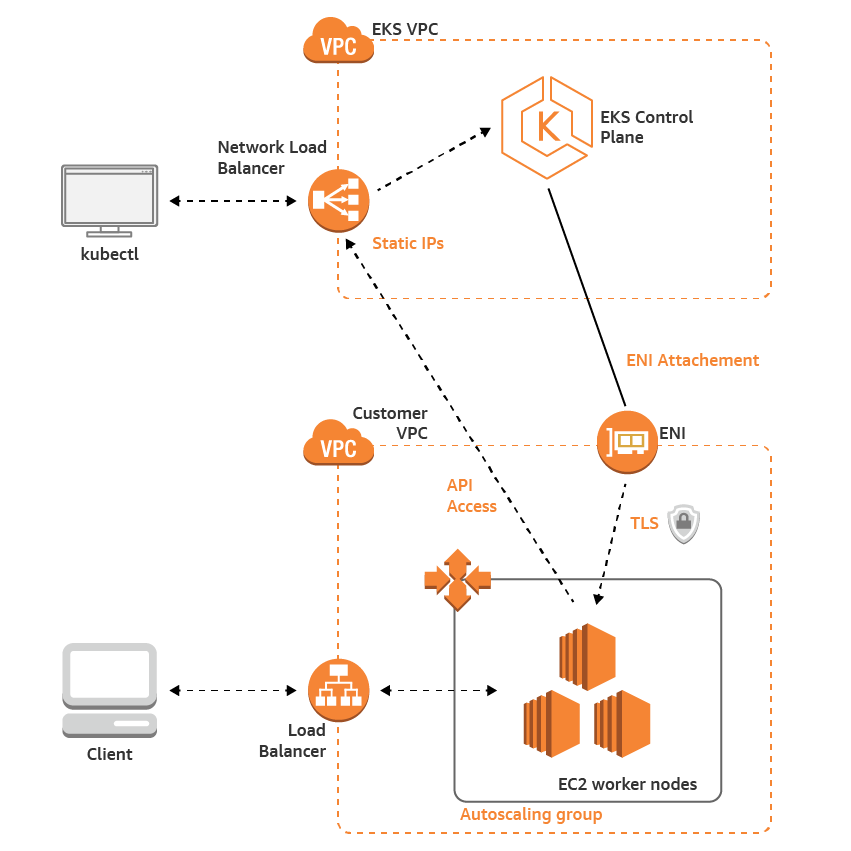
Our objective is to create a new project using the architecture pictured below. As you can see we’re going to distribute the incoming traffic to a set of EC2 worker nodes that are grouped in a K8s cluster using a load balancer (ELB). On top of that we will take advanted of a control layer that will allow us to interact with the cluster and the worker nodes (orchestration).
I guess that’s enough talking, if you want to deepen your understanding of this subject you’ll find all the information either on the EKS or K8s websites.
Requirements
- Docker and docker desktop (at the time of writing v19.03.2)
- Kubernetes (v1.14+)
- AWS cli
- eksctl (CLI tool for creating clusters on EKS)
- sbt v1.3+
AWS CLI
First of all, let’s install the AWS CLI using pip:
$ pip3 install awscli --upgrade --user

~ aws --version
aws-cli/1.16.261 Python/3.7.4 Darwin/19.0.0 botocore/1.12.251
If your target is a single AWS region I’ll suggest you to configure it using the following command to avoid passing the region as a parameter for each instruction that we’re going to use. We’re going to target the EU Ireland region for the rest of this tutorial.
aws configure set region eu-west-1
You will also need to configure the access credentials in order to interact with AWS using the CLI:
$ aws configure
AWS Access Key ID [None]: AKIAIOSFODNN7EXAMPLE
AWS Secret Access Key [None]: wJalrXUtnFEMI/K7MDENG/bPxRfiCYEXAMPLEKEY
Default region name [None]: us-west-2
Default output format [None]: json
Managing EKS clusters using eksctl and kubectl
Looking at the current state of the EKS documentation you could choose to create and admin your clusters using three different approaches. I’ve tested two of them already and I strongly recommend to go for eksctl without hesitation. It’s the most reliable and clear method. For instance, when I tried to create my cluster using using the AWS console I started receiving this beautiful error:
The connection to the server localhost:8080 was refused - did you specify the right host or port?
I then found this note on the K8s website
If you see a message similar to the following, kubectl is not configured correctly or is not able to connect to a Kubernetes cluster.
Then on this medium post, and not on the official documentation, I found that you have to tell eks to generate a new configuration file in ~/.kube/config for you using the command: aws eks update-kubeconfig --name YOURClusterName.
Lond story short, please install eksctl and use it to create and admin your clusters. In my case installing eksctl using Homebrew also means that kubectl will be also installed automatically and you can check if the two commands have been correctly installed on your host machine with this couple of commands:
$ eksctl version
[ℹ]  version.Info{BuiltAt:"", GitCommit:"", GitTag:"0.7.0"}

$ kubectl version --short --client
Client Version: v1.16.2

$ kubectl config current-context
.... Should return a reference to your current EKS context
Creating your first cluster on EKS
Now we’re ready to create our first cluster, named colossus, on EKS
$ eksctl create cluster \
--name colossus \
--version 1.14 \
--nodegroup-name standard-workers \
--node-type t3.medium \
--nodes 3 \
--nodes-min 1 \
--nodes-max 4 \
--node-ami auto
From now on we’ll refer to it as colossus-cluster.
Creating the nodegroup
$ eksctl create nodegroup \
--cluster colossus \
--version auto \
--name standard-workers \
--node-type t3.medium \
--node-ami auto \
--nodes 3 \
--nodes-min 1 \
--nodes-max 4

[ℹ]  eksctl version 0.7.0
[ℹ]  using region eu-west-1
[ℹ]  will use version 1.14 for new nodegroup(s) based on control plane version
[ℹ]  1 nodegroup(s) that already exist (standard-workers) will be excluded
[ℹ]  combined exclude rules: standard-workers
[ℹ]  1 nodegroup (standard-workers) was excluded (based on the include/exclude rules)
---
[ℹ]  no tasks
[✔]  created 0 nodegroup(s) in cluster "colossus"
[ℹ]  checking security group configuration for all nodegroups
[ℹ]  all nodegroups have up-to-date configuration
Managing Docker images

We have a new cluster with worker nodes ready to be used, but we need to deploy our application into this system somehow. It comes out that in order to do that quite easily one can take advantage of Amazon Elastic Cloud Registry (ECR), which is essentially a Docker registry for AWS (note that you will find a similar one in GCP). You can simply create a new repository in that registry and then you can authenticate your docker client using:
$(aws ecr get-login --no-include-email --region eu-west-1)
And then in order to create and push the version 0.25.99 of your “colossus app” to the ECR:
docker tag colossus-app:0.25.99 yourid.dkr.ecr.eu-west-1.amazonaws.com/colossus-repo:0.25.99
docker push yourid.dkr.ecr.eu-west-1.amazonaws.com/colossus-app:0.25.99
Create a new deployment
I think that the best way to create a new deployment on EKS is to use a yaml file that will target the image that we’ve just uploaded to the docker registry. Doing that we’ll be able to target a set of specific HTTP ports, while defining readiness and liveness probes. In this example our app is listening to HTTP on 8080 and HTTPS on 8081. What is more, it should return an empty HTTP response (OK 200) on /api/healthz.
apiVersion: apps/v1
kind: Deployment
metadata:
  name: colossus-deploy
  labels:
    app: colossus-app
  namespace: default
spec:
  replicas: 1
  selector:
    matchLabels:
      app: colossus-app
  strategy:
    rollingUpdate:
      maxSurge: 25%
      maxUnavailable: 25%
    type: RollingUpdate
  template:
    metadata:
      labels:
        app: colossus-app
    spec:
      containers:
        - image: yourid.dkr.ecr.eu-west-1.amazonaws.com/colossus-app:0.25.99
          imagePullPolicy: IfNotPresent
          livenessProbe:
            failureThreshold: 10
            httpGet:
              path: /api/healthz
              port: 8080
              scheme: HTTP
            periodSeconds: 30
            successThreshold: 1
            timeoutSeconds: 20
          name: colossus-app
          ports:
            - containerPort: 8080
              protocol: TCP
            - containerPort: 8081
              protocol: TCP
          readinessProbe:
            failureThreshold: 10
            httpGet:
              path: /api/healthz
              port: 8080
              scheme: HTTP
            periodSeconds: 30
            successThreshold: 1
            timeoutSeconds: 20
      restartPolicy: Always
To apply this deployment script to your cluster you have to save this script, naming it colossus-deploy.yaml and then:
$ kubectl apply -f ./colossus-deploy.yaml
Testing your deployment
In order to test your deployment effectively you can open an SSH connection to a POD running the app with:
$ kubectl get pods
$ kubectl exec -it colossus-app-POD-ID -- /bin/bash
if your app ships with bash. Otherwise you can simply use a full fledged zsh image “on the fly” that will live as long as the connection is open:
$ kubectl run -i --tty --rm debug --image=zshusers/zsh:master --restart=Never -- zsh
This image is based on Bitnami’s minideb. You can find more info on its GitHub repo. Then you can easily install all the deb packages you need using
$ install_packages dnsutils wget .....
I found it the easiest way to test networking issues between RDS and my K8s cluster, so I’ll strongly recommend to give it a try whenever you have to face VPC issues or to check if the iptables underneath are actually working.